Notice: Function _load_textdomain_just_in_time was called incorrectly. Translation loading for the atk-altokom domain was triggered too early. This is usually an indicator for some code in the plugin or theme running too early. Translations should be loaded at the init action or later. Please see Debugging in WordPress for more information. (This message was added in version 6.7.0.) in /home/alto/staging.altokom.com/wp-includes/functions.php on line 6131

Warning: Cannot modify header information - headers already sent by (output started at /home/alto/staging.altokom.com/wp-includes/functions.php:6131) in /home/alto/staging.altokom.com/wp-includes/feed-rss2.php on line 8
Knowledge Base - Altokom https://staging.altokom.com/resources/knowledge-base/ Helping Businesses Leverage Technology Mon, 05 Feb 2024 09:22:19 +0000 en-GB hourly 1 https://wordpress.org/?v=6.9.4 https://staging.altokom.com/wp-content/uploads/2017/02/cropped-altokom-site-identity-32x32.png Knowledge Base - Altokom https://staging.altokom.com/resources/knowledge-base/ 32 32 How to Send Large Attachments https://staging.altokom.com/resources/knowledge-base/how-to-send-large-attachments-2/ Tue, 30 Jan 2024 12:51:48 +0000 https://staging.altokom.com/?post_type=kb&p=661 Use the file storage feature to send attachments that are too large to be sent directly via email. With the file storage feature, you can send large files by uploading them to the mail server and then share the links to these files in your emails. Your email recipients can then use the shared links...

The post How to Send Large Attachments appeared first on Altokom.

]]>
Use the file storage feature to send attachments that are too large to be sent directly via email. With the file storage feature, you can send large files by uploading them to the mail server and then share the links to these files in your emails.

Your email recipients can then use the shared links to download the attachments. Files uploaded to the server count toward your mailbox quota; thus, you are encouraged to delete files from the server that are no longer needed whenever possible.

  1. Log in to webmail e.g. https://webmail.yourdomain.com. On the top menu bar, click More to expand the drop-down menu, then click File Storage.
  2. Click on Upload and select the file you want to add.
  3. Click on your newly uploaded file. On the modal window that appears, switch on Enable Public Access (1) .
  4. A link will now show. Copy this link (2), then click Save(3).
  5. In your email, paste the copied link, informing the recipient to download the attachment using the link provided.

Note: For additional security, you can include an expiration date for the link and/or password-protect the link.

The post How to Send Large Attachments appeared first on Altokom.

]]>
How to Setup Email Account on Android Device https://staging.altokom.com/resources/knowledge-base/how-to-setup-email-account-on-android-device/ Mon, 29 Jan 2024 10:00:57 +0000 https://staging.altokom.com/?post_type=kb&p=646 To set up an email account on your Android device, follow the steps below: 1. Open the Gmail app 2. Click the three overlapping bars on the top-left of the screen 3. On the menu bar, click on Settings. 4. Click Add Account. 5. On the list of options provided, select Google. 6. You have...

The post How to Setup Email Account on Android Device appeared first on Altokom.

]]>
To set up an email account on your Android device, follow the steps below:
1. Open the Gmail app

2. Click the three overlapping bars on the top-left of the screen

3. On the menu bar, click on Settings.
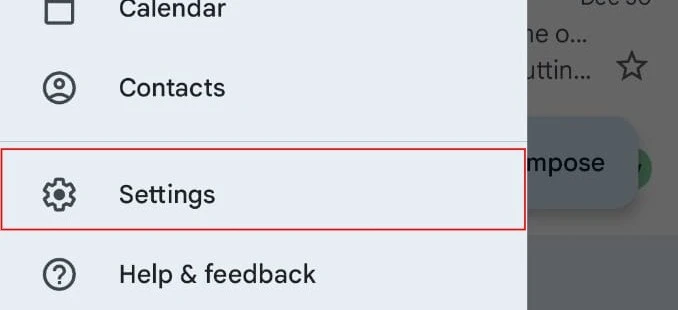
4. Click Add Account.

5. On the list of options provided, select Google.

6. You have to enter your PIN/password to proceed.

7. Click Create Account (1)

8. Two options: For my personal use (2) Or For work or my business (3). Choose which one suits your purpose and click Next (4).

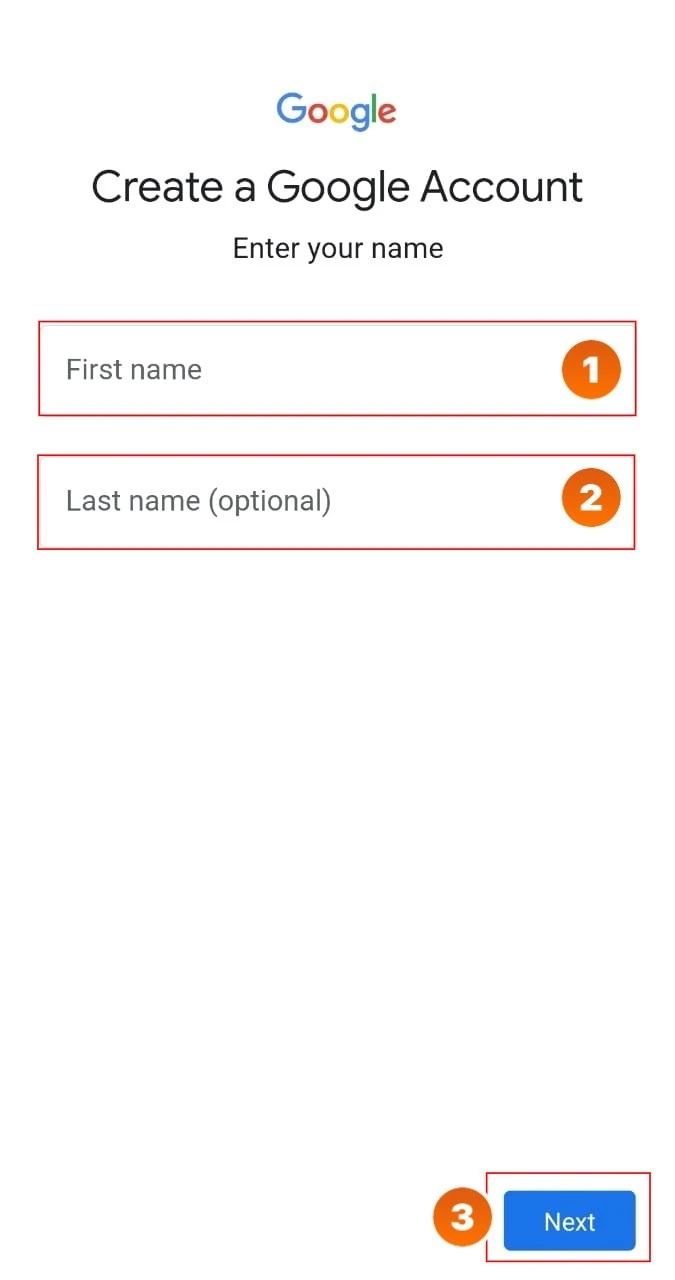
9. Fill in the First name (1) and Last name (2) fields and click Next (3) (Last name is optional).
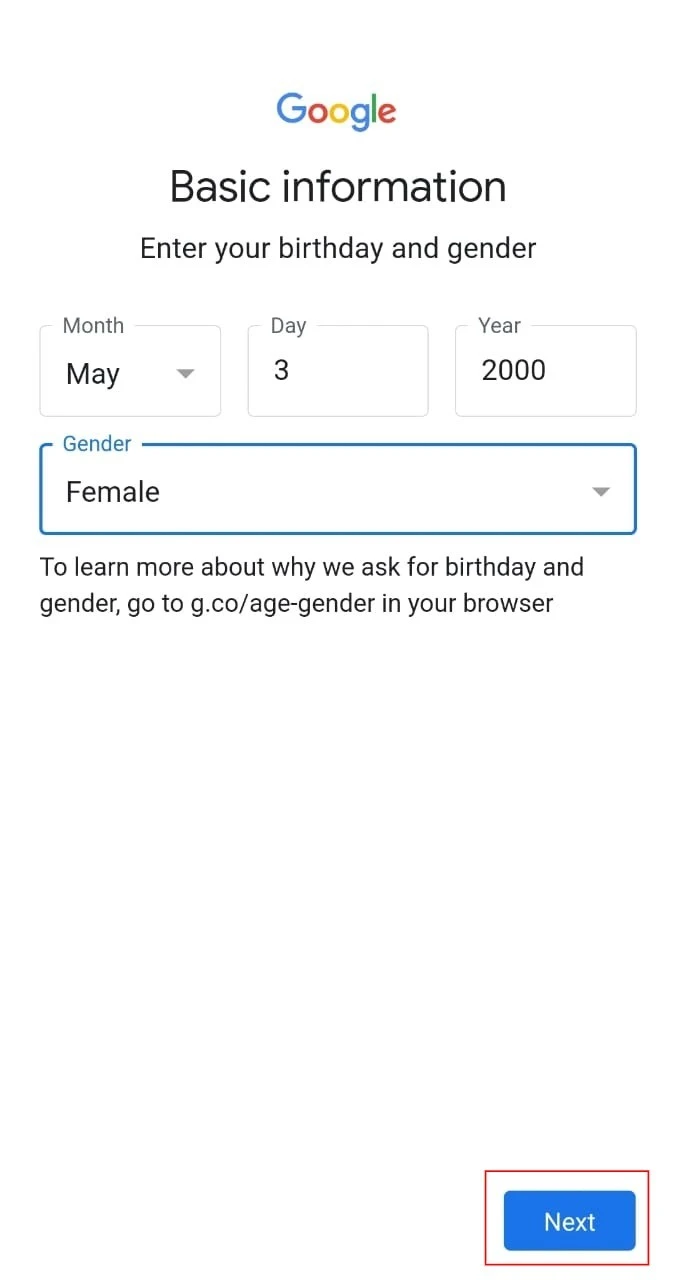
10. Enter your birthday and Gender, then click Next.

WhatsApp Image 2024-01-01 at 13.04.03 (2).jpeg

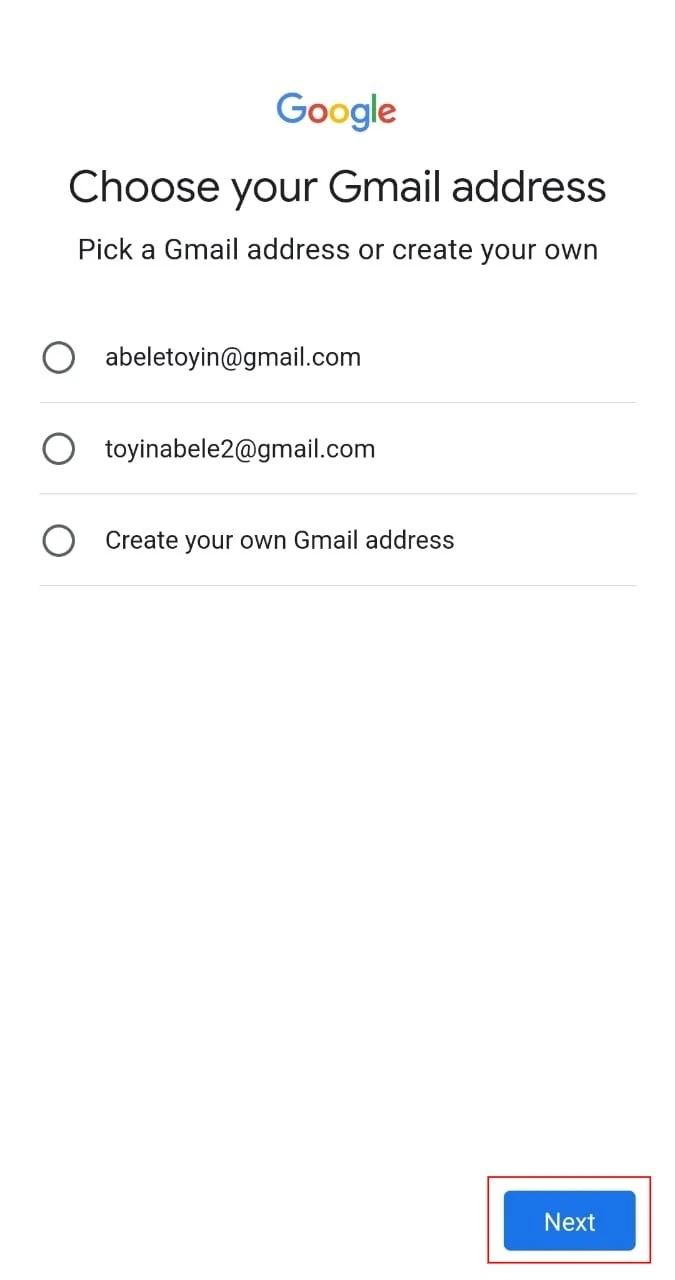
11. You can either pick one of the suggested email addresses or create yours. Then click Next.
12. Click Yes, I’m in on the bottom-right of the screen.

13. A page will pop up to review your account info. Click Next

14. Click I agree on the next page that appears
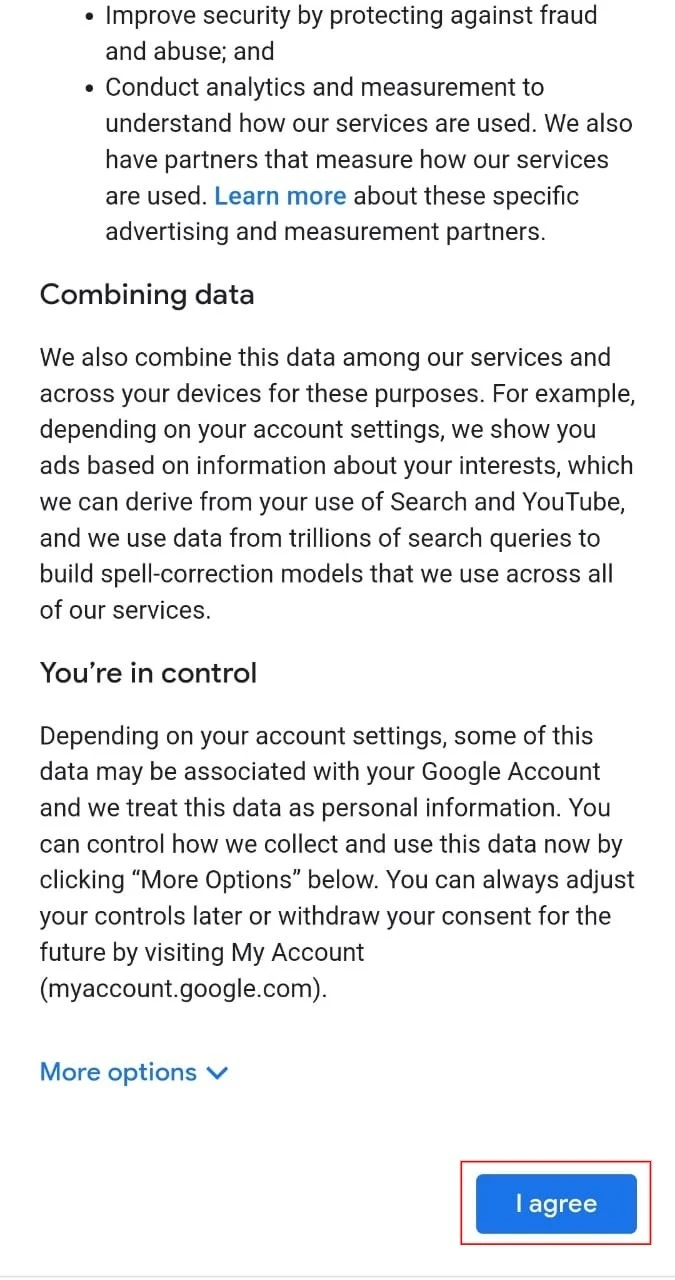
Your email account is now set up.

The post How to Setup Email Account on Android Device appeared first on Altokom.

]]>
How to view an Email Header in Webmail https://staging.altokom.com/resources/knowledge-base/how-to-view-an-email-header-in-webmail/ Sun, 30 Jun 2019 00:49:04 +0000 https://staging.altokom.com/?post_type=kb&p=532 Log in to webmail i.e. https://webmail.yourdomain.com. Select the email you want to view the header. Click on the ellipses […] button at the top of the content pane. Select View Header; a modal will appear with the email header....

The post How to view an Email Header in Webmail appeared first on Altokom.

]]>
  • Log in to webmail i.e. https://webmail.yourdomain.com.
  • Select the email you want to view the header.
  • Click on the ellipses [] button at the top of the content pane.
  • Select View Header; a modal will appear with the email header.
  • The post How to view an Email Header in Webmail appeared first on Altokom.

    ]]>
    How to Change a User’s Password https://staging.altokom.com/resources/knowledge-base/how-to-change-a-users-password/ Sat, 29 Jun 2019 14:23:20 +0000 https://staging.altokom.com/?post_type=kb&p=526 Only users with admin rights are able to change a user’s password. Changing a user’s password is done via webmail. Log in to webmail i.e. https://webmail.yourdomain.com with an email administrator account. On the top menu bar, click Domain Settings (gear with globe icon). On the navigation pane click on Accounts. Double-click on the user account...

    The post How to Change a User’s Password appeared first on Altokom.

    ]]>
    Only users with admin rights are able to change a user’s password. Changing a user’s password is done via webmail.

    1. Log in to webmail i.e. https://webmail.yourdomain.com with an email administrator account.
    2. On the top menu bar, click Domain Settings (gear with globe icon).
    3. On the navigation pane click on Accounts.
    4. Double-click on the user account that you want to change the password.
    5. Click on the ellipsis ‘‘ button at the top of the content pane.
    6. Click Change Password; the Password modal will appear.
    7. Enter in the following details:
      • Password: enter a password for the account. The password requirements are displayed and will change from Red to Green when the requirements have been met.
      • Confirm Password: re-enter the password.
    8. Click Save.

    The post How to Change a User’s Password appeared first on Altokom.

    ]]>
    How to Change Password and Server Settings in Outlook 2016 https://staging.altokom.com/resources/knowledge-base/how-to-change-password-and-server-settings-in-outlook-2016/ Mon, 24 Jun 2019 12:15:03 +0000 https://staging.altokom.com/?post_type=kb&p=503 Open Microsoft Outlook. Click on the menu tab File. Click on Account Settings. Select Server Settings. In the Incoming mail tab update your password and/or server details. Then select the Outgoing mail tab and update the server details. Click Next....

    The post How to Change Password and Server Settings in Outlook 2016 appeared first on Altokom.

    ]]>
  • Open Microsoft Outlook.
  • Click on the menu tab File.
  • Click on Account Settings.
  • Select Server Settings.
  • In the Incoming mail tab update your password and/or server details.
  • Then select the Outgoing mail tab and update the server details.
  • Click Next.
  • The post How to Change Password and Server Settings in Outlook 2016 appeared first on Altokom.

    ]]>
    How to Setup Email Account on Outlook 2016 https://staging.altokom.com/resources/knowledge-base/how-to-setup-email-account-on-outlook-2016/ Sat, 22 Jun 2019 12:02:01 +0000 https://staging.altokom.com/?post_type=kb&p=477 To add your email account to Outlook 2016, follow the steps below: Open Microsoft Outlook. Click on the menu tab File. Click on Add Account. In the pop up modal type in your email address. Click Advanced options and check the box Let me setup up my account manually. Click Connect. Select POP or IMAP....

    The post How to Setup Email Account on Outlook 2016 appeared first on Altokom.

    ]]>
    To add your email account to Outlook 2016, follow the steps below:

    1. Open Microsoft Outlook.
    2. Click on the menu tab File.
    3. Click on Add Account.
    4. In the pop up modal type in your email address.
    5. Click Advanced options and check the box Let me setup up my account manually.
    6. Click Connect.
    7. Select POP or IMAP. We recommend IMAP.
    8. Type in your account password, then click Connect.
    9. You will then see the confirmation – Account successfully added.
    10. Click Done.

    If after step 7 you aren’t asked to type in your password but shown the following pop-up window, continue with the steps below instead:

    1. Update Server Settings
      1. Incoming mail
        Server: mail.yourdomain.com
        Port: 993
        Encryption: SSL/TLS
      2. Outgoing mail
        Server: mail.yourdomain.com
        Port: 465
        Encryption: SSL/TLS
    2. Click Next.
    3. Type in your account password, then click Connect.
    4. You will then see the confirmation – Account successfully added.
    5. Click Done.

    To update the display name associated with your email account do the following:

    1. Click on the menu tab File.
    2. Click on Account Settings.
    3. Select Account Name and Sync Settings.
    4. Type in your name in the Your name text box.
    5. Click Next.
    6. Click Done.

    The post How to Setup Email Account on Outlook 2016 appeared first on Altokom.

    ]]>
    Setup a Recovery Email Address https://staging.altokom.com/resources/knowledge-base/setup-a-recovery-email-address/ Fri, 21 Jun 2019 12:58:30 +0000 https://staging.altokom.com/?post_type=kb&p=474 Setting up a recovery email address enables you reset your password in the event you’ve forgotten it. Instructions on resetting  your email account password will be sent to your recovery email address. Log in to webmail i.e.  https://webmail.yourdomain.com. On the top menu bar, click Settings (gear icon). In the User card section, enter an email...

    The post Setup a Recovery Email Address appeared first on Altokom.

    ]]>
    Setting up a recovery email address enables you reset your password in the event you’ve forgotten it. Instructions on resetting  your email account password will be sent to your recovery email address.

    1. Log in to webmail i.e.  https://webmail.yourdomain.com.
    2. On the top menu bar, click Settings (gear icon).
    3. In the User card section, enter an email address in the Recovery Email Address field.
    4. Click Save.

    The post Setup a Recovery Email Address appeared first on Altokom.

    ]]>
    How to Setup a Signature in Outlook 2016 https://staging.altokom.com/resources/knowledge-base/how-to-setup-a-signature-in-outlook-2016/ Tue, 18 Jun 2019 22:04:21 +0000 https://staging.altokom.com/?post_type=kb&p=447 Open Microsoft Outlook 2016. Click on the menu tab File. Click on Options. Select the Mail tab and then on your right Signatures. Click on New and type in a name for the signature. Click Ok. In the text box type in the content of the signature. Click Ok. The email signature will now automatically...

    The post How to Setup a Signature in Outlook 2016 appeared first on Altokom.

    ]]>
  • Open Microsoft Outlook 2016.
  • Click on the menu tab File.
  • Click on Options.
  • Select the Mail tab and then on your right Signatures.
  • Click on New and type in a name for the signature.
  • Click Ok.
  • In the text box type in the content of the signature.
  • Click Ok.
  • The email signature will now automatically appear with each email you send in Outlook. Please note, if you also use webmail or a mobile device to send your emails, you will need to add your email signature in these applications.

    The post How to Setup a Signature in Outlook 2016 appeared first on Altokom.

    ]]>
    How to Setup a Signature in Webmail https://staging.altokom.com/resources/knowledge-base/how-to-setup-a-signature-in-webmail/ Tue, 18 Jun 2019 21:38:43 +0000 https://staging.altokom.com/?post_type=kb&p=442 Log in to webmail i.e. https://webmail.yourdomain.com. In the top menu, click Settings (gears icon). In the navigation pane on the left, click on Signatures. In the content pane click + New Signature. In the Name field, type in the name of the signature. In the text box type in the content of the signature. Click...

    The post How to Setup a Signature in Webmail appeared first on Altokom.

    ]]>
  • Log in to webmail i.e. https://webmail.yourdomain.com.
  • In the top menu, click Settings (gears icon).
  • In the navigation pane on the left, click on Signatures.
  • In the content pane click + New Signature.
  • In the Name field, type in the name of the signature.
  • In the text box type in the content of the signature.
  • Click Save.
  • The new signature will appear in the Signatures pane. You can edit or delete the signature by clicking on it.
  • If the Mapped Field pane isn’t disabled by your Email Administrator, select the signature you just setup.
  • Click Save.
  • The email signature will now automatically appear with each email you compose in webmail. Please note, if you also use an email client or mobile device to send your emails, you will need to add your email signature in these applications.

    The post How to Setup a Signature in Webmail appeared first on Altokom.

    ]]>
    How to Setup a Domain-wide Signature in Webmail https://staging.altokom.com/resources/knowledge-base/how-to-setup-a-domain-wide-signature-in-webmail/ Tue, 18 Jun 2019 19:16:14 +0000 https://staging.altokom.com/?post_type=kb&p=434 Only users with admin rights are able to setup a domain-wide signature in webmail. Log in to webmail (https://webmail.yourdomain.com) with  an email administrative account. On the top menu bar, click Domain Settings (gears with globe icon) In the navigation pane on the left click on Signatures. In the content pane click + New Signature. In...

    The post How to Setup a Domain-wide Signature in Webmail appeared first on Altokom.

    ]]>
    Only users with admin rights are able to setup a domain-wide signature in webmail.

    1. Log in to webmail (https://webmail.yourdomain.com) with  an email administrative account.
    2. On the top menu bar, click Domain Settings (gears with globe icon)
    3. In the navigation pane on the left click on Signatures.
    4. In the content pane click + New Signature.
    5. In the Name field, type in the name of the signature.
    6. In the text box type in the content of the signature.
    7. Click Save.
    8. The new signature will appear in the Signatures pane. You can edit or delete the signature by clicking on it.
    9. In the Mapped Field pane click on your domain name
    10. Select the signature you just setup
    11. Switch off Allow users to override this mapping. This will make the signature a domain-wide signature.
    12. Click Save.

    The post How to Setup a Domain-wide Signature in Webmail appeared first on Altokom.

    ]]>